Showing posts with label Fall. Show all posts

Friday, September 4, 2015

Fall decorating!

The air is turning a bit more crisp and the leaves are beginning to change!  YAY FALL!
Time to pull out the sweaters and warms, cozy blankets and autumnize your surroundings.
I am such a huge "sensory" person so when the seasons change, the smells, sounds and sights change around my house as well.  

Scent-
Start with a fall candle, wax melt or plug in. Scent has such an impact on your mood.  I never thought my husband noticed some of these things but after being gone for a bit, he came home to all of the fall scents at home and instantly said, "I can't wait for the fall parties!".  Love it!
One of my favorites is the pumpkin scents from Bath and Body Works. (Not promoting for them. Just my own opinion.)

Interior-
If you have a large or even small surface in your entry, it's the perfect place to decorate for fall.  Grab anything orange, brown, green, deep yellow or red.  Once the leaves fall, grab some of those too! Use things that are difference shapes and sizes.  Play with it a bit and group things in odd numbers. You'll be surprised how things pull together.  Of course, you can always contact me for some fall decor items! :) But be creative!  Bring in things from outside, old windows, tins, etc.
vinyl decals, entry decor, fall
Mums and cabbage!
It doesn't take much to bring a little Fall home.  A few carefully placed mums and cabbages make a huge impact and are beautiful. Don't throw out all of your summer flowers.  As long as a freeze doesn't sneak up on you, just edit the sad looking plants and replace them with the mums and cabbages.  This will keep the budget low and you will have a full planter for several more weeks!
Once the summer plantings start to die back, just replace them with pumpkins and gourds!

Here are some pictures of my porches.  Not overkill {for now}. Just a touch of fall for Sept.  I change everything out for Halloween and again for Thanksgiving so I ease into it. :)
plants, entry

plants, fall, entry, porch
A great transition tip!
Fall foliage can be used thru Thanksgiving. If you are careful, you can add faux fall foliage to your live plants and add to it through the fall holidays.  Just do not over do it and use plants that look semi real.  Nothing is tackier than those ugly plastic plants!  Just blend them into the real foliage and viola! Instant beauty! 

Not just the foliage but decorative items can be used all season long. You can change out things here and there for Halloween and Thanksgiving without having to change everything! Keep the base of your decorative items neutral. For instance, table runners, garland, etc. 

porch, plants


Friday, August 28, 2015

Fall home decor class!

Where have I been you say?  LIFE TOOK ME AWAY for awhile but I'm back!

It's time for those fun classes again!  In just 2 week I will be hosting the class for this cute Autumn chalboard sign.  It is about 20x14 and the wood color is either a distressed white or gray/tan.  The cost of the class is just $32.

Let me know if you want to attend the class and/or be on the email list!


Wednesday, March 25, 2015

Home decor classes~

If you are not on the email list and are interested in my home decor craft classes sign up now!  I am just finishing my remodel so I will be back into the swing of things asap! :)

Thursday, October 18, 2012

Halloween Decor

I am stuck at home after having shoulder surgery yesterday so I thought I would post some of my Halloween décor from this year today! You can see some of my past years as well if you click on Halloween on the right hand bar!


Thursday, October 11, 2012

Thursday, November 10, 2011

Thanksgiving Decor Ideas

I have been working on my fall decor for Thanksgiving.  Here is my Thanksgiving Mantle and a beautiful gold platter that I found at Hobby Lobby and added one of my vinyl designs to it. 
The base of my swag on the mantle is a beautiful winter garland with snow dipped tips.  I love to add a little bit of winter to my Thanksgiving decor.  When Thanksgiving is over I just have to remove the Fall garlands and add Christmas items to it! 
Image Thankgsgiving vinyl decal decor

Image Thankgiving Mantle

Image Thankgiving Mantle

Wednesday, October 26, 2011

Thanksgiving Gratitude Board

I absolutely LOVE this idea!  What a great project to do with your kids or girlfriends!  The idea is to pull a card each day for each member of your family to write down what they are thankful for.  30 days of Gratitude...I love it!  I think I will add a spot at the bottom of the board where you can clip the "gratitude paper" on to display what has been written for the day.
I will post my board as soon as I make it! 


Here is the tutorial-

What you'll need: plywood board or foam board, brown paint, 30 coin envelopes, variety of scrapbook paper, vinyl or printed numbers, glue stick, Mod Podge, ribbons, hole punch, white cardstock, glue gun

Make it: Paint your board brown. Cut off the top part of your envelopes until they are 3 ¾-inch tall, and glue scrapbook paper to the front of each. Then, use Mod Podge to glue on the numbers 1-30 -- you can cut them out of paper with stencils or use stickers or vinyl. After your Mod Podge is dry, hole punch two small holes in the top of your envelope and tie a small ribbon through the holes. Use your hot glue gun to attach the envelopes onto the board -- five rows and six columns. Cut out a "Give Thanks" title and Mod Podge it to the top of your board. Insert a small piece of blank white cardstock into each envelope. Each night in November, ask your kids to pull the cardstock out on the appropriate day and write down something they are thankful for that day.

Here is another version from Embellishing Life Everyday.

Image Thankgiving vinyl decal

Tuesday, October 25, 2011

Thanksgiving Decor Ideas

Thanksgiving is just around the corner.  I absolutely love this time or year.  It is such a great time to snuggle in and refocus ourselves on family and friends.  I love to involve the kids when decorating.It creates fun memories and connects them to the special feeling of Thanksgiving!


Today I thought I would share a fun idea that is super simple and classy.  These are featured on
http://www.etsy.com/shop/funkyshique.  She can customize the banners or buntings to your liking.  The prices are very reasonable as well!  If you are a do it yourselfer, you could use burlap, stencils and a bit of paint and create your own. This would be a great project to involve the kids in as well. I know that you can purchase pre-cut burlap pendants at Joannes but it would be super easy and inexpensive to purchase burlap by the yard and cut your own!

Take it a step further and embellish your banners with buttons, bows or ribbon!

Tuesday, October 4, 2011

Halloween is SWEET!

Today I thought I would share some fun new to me Halloween recipes. Don't forget your presentation! It is a big part of the Halloween experience! Make the food just as BOOtiful as it is delicious! 

Adams Scary Apples
are STUNNING!  Have you ever seen more beautiful candied apples?
http://www.mattbites.com/

Red & Black Candy Apples

8-10 medium sized apples
8-10 wooden twigs, twimmed
3 cups granulated sugar
1/2 cup light corn syrup
1 cup of water
several drops of cinnamon flavored oil
1/4 teaspoon of red food coloring
1/4 teaspoon of black food coloring
Clean and dry the apples. Try to remove as much of the wax as possible. If you purchase them from your local farmer’s market then chances are they have not been treated with the food grade wax that makes then shine. Remove any stems or leaves and insert a twig into the end of each apple. To facilitate easier twig entry you can carefully sharpen the end of the twig or use a candy stick to create a guide hole. Set apples aside.
Heat and stir sugar, corn syrup and water in a saucepan until sugar has dissolved. Boil until the syrup reaches 300 degrees on a candy thermometer. Don’t go over 310 degrees or your candy burns and then you’ll be sad.
Remove from heat and stir in flavored oil and food coloring.
Dip one apple completely in the syrup and swirl it so that it becomes coated with the melted sugar candy. Hold the apple above the saucepan to drain off excess. Place apple, with the stick facing up, onto a baking sheet that’s greased or lined with a silpat. Repeat the process with the remaining apples. If your syrup thickens or cools too much, simply reheat briefly before proceeding. Let the apples cool completely before serving.
A note about the black apples: Lighter colored apples (Granny Smith, Golden Delicious) work well in making the red appear bright and glassy; darker apples like red delicious help the black candy appear as dark as possible. Muy spooky!
Also, Adam made one batch with red food coloring and after he had a few red apples he reheated the candy mixture and added black food coloring. Adding black to red will make it darker. He repeated the dipping process. Black food coloring can be found online or at specialty baking stores.

 
Moldy cheese balls!
ingredients
  • 1-8-ounce package cream cheese
  • 1 cup finely shredded Gouda cheese (4 ounces)
  • 1/4 cup butter
  • 1 tablespoon milk
  • 1/2 teaspoon Worcestershire sauce for chicken
  • 2 tablespoons thinly sliced green onion (1)
  • 2 tablespoons snipped fresh dill or 2 teaspoons dried dillweed
  • 1/2 cup chopped toasted almonds
  • Assorted crackers and/or flatbread

directions

1. In a large bowl let cream cheese, Gouda, and butter stand at room temperature for 30 minutes. Add milk and Worcestershire sauce. Beat with an electric mixer on medium speed until light and fluffy. Stir in green onion and dill. Cover and chill for 4 to 24 hours.
2. Before serving, shape cheese mixture into a ball. Roll ball in nuts and let stand 15 minutes. Serve with crackers or flatbread. Makes about 30 (1-tablespoon) servings.
3. Make-ahead directions: Prepare as above in Step 1. Shape cheese mixture into a ball; wrap in plastic wrap. Freeze for up to 1 month. To serve, thaw the cheese ball in the refrigerator overnight. Unwrap and roll in nuts. Let the cheese ball stand at room temperature for 15 minutes before serving.
4. Prosciutto-Basil Cheese Ball: Prepare as above, except substitute finely shredded fontina cheese for the Gouda cheese; stir in 2 ounces chopped prosciutto and 2 tablespoons snipped fresh basil with the green onion and omit the dill. Substitute chopped toasted pine nuts for the almonds. If desired, serve with apples, crackers, or flatbread.
5. Spicy Taco Cheese Ball: Prepare as above in Step 1, except substitute finely shredded taco cheese for the Gouda cheese, stir in 2 tablespoons bottled chopped jalapeno chile peppers with the green onion, and omit the dill. Substitute 1/2 cup crushed corn chips for the almonds.
6. To make logs: Divide recipe into 4 portions and shape accordingly.

This is another great way to serve the cheese ball-


Crock-Pot Baked Apples
Image and Recipe Copyright © 2008 Jennifer Iserloh
http://www.skinnychef.com

Makes 6 baked apples

Ingredients

1/4 cup brown sugar
1/4 cup walnuts, chopped
2 tablespoons trans-fat free margarine
1 teaspoon cinnamon
6 Gala or Macintosh apples, cored
1/2 cup apple juice or apple cider
2 tablespoons orange liquor (optional)

Directions

Preheat a large crock-pot on high heat and preset it for 3 hours. In a large bowl, mix brown sugar, walnuts, margarine, and cinnamon. Fill the apples with the filling and place them in the crock-pot. Pour in the apple juice or cider and the liquor, if using. Cover and cook 2 1/2 to 3 hours on high heat until the apples are soft and begin to collapse.

Cup of mac!

Ingredients


1 pound elbow macaroni
1 stick of butter
3 tablespoons Frank's Hot Sauce
2 large eggs
3 (12 ounce) cans of evaporated milk
20 ounces grated extra sharp cheddar cheese
8 ounce block of Monterey Jack cheese with jalepeno peppers, grated
salt and pepper to taste
Directions

Preheat oven to 350.
Boil the pasta until it is slightly under done. Drain and return to pot. Add butter, hot sauce, salt and pepper. Mix well and set aside.
In a bowl, beat eggs slightly, combine with evaporated milk and set aside.
In a second bowl, grate cheeses, combine and set aside.
Prepare muffin tins by spraying with cooking spray.
Stir of grated cheese to cooled pasta. Mix well.
Fill each muffin mold with cup of pasta mix.
Carefully pour enough milk/egg mix into muffin tins placed on cookie sheets.
Place in hot oven and bake for 45 minutes or until muffins have an evenly brown crust.
Remove pans from oven and allow cooling for 20 minutes.

Serve and enjoy!

Wednesday, September 28, 2011

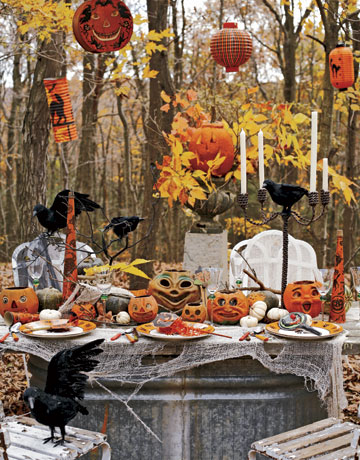
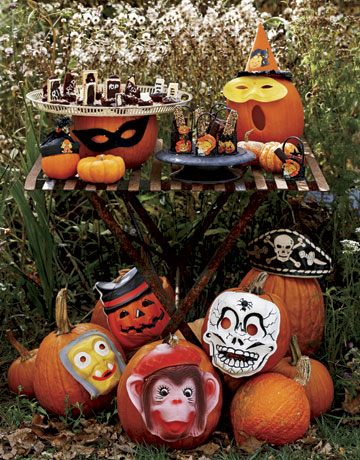
Lets take a walk back in time....Ahhh, vintage Halloween! I just love it! These photos are all from Country Living. They have done a great job displaying many different vintage pieces. How fun would it be to be able to have an outdoor Halloween party?


I have found a couple designers that offer vintage holiday reproductions. Bethany Lowe Designs is one of the best! You can google her name to find a distributor. I have actually found some of her designs at TJ MAXX! It's a long shot so be there on their delivery day if you want to find the best of the best as her designs tend to be a bit more pricey so they are hard to find at a discounted price...but well worth it! Take a look at some of her designs. They are so darling!