Showing posts with label DIY. Show all posts

Wednesday, January 22, 2014

Seahawk fever!

Love my Seahawks!!! We are Super Bowl bound!

Seattle is the best place to be this time of year!  There is blue and green EVERYWHERE! Seattle love's their Hawks!  I may or may not have the FEVER!


Just a little somethin' I made for myself. Yes, I made some vinyl decals to dress up these puppies!  A little glue, glitter and Shelac and BAM!   (Tutorial Below)


So you want to make your own glitter shoes?  Here's how. (Smooth material works best.)

-If you are going to apply a decal to your shoe, make sure it is exterior grade vinyl. (AND I can help you that! :)   

-Clean the surface of the shoe with rubbing alcohol to remove any residue or dirt. (Just the area where you will be applying the vinyl.) Next, apply your decal.

Time to add the bling!

-Grab some EXTERIOR Modge Podge and apply it with a small paint brush. Work with ONE area at a time.  If you are doing multiple colors it is best to work with one color at a time so that your colors don't get mixed.  I used 2 different sized brushes.  A really fine one to go around the decals and a larger one for the open areas. Take care not to get glue on the decal.  If you do just wipe it of with a Q-tip.  Don't fret if you find glitter stuck to the decal, you can carefully scrape it off with your nail.  DO NOT apply your decal on top of the glitter.  IT WON'T STICK!

-Once you apply your glue, sprinkle your glitter over the area.  BE SURE YOU HAVE A PAPER TO CATCH THE EXTRA GLITTER. (This way you can pour the excess glitter back in the jar to use again.)

-Move to the next area that will be the same color and repeat.  Do this until you have completed all of the areas that you want to cover with your first color. 

-Repeat with each color.

-Let the Modge Podge dry overnight and seal it the next day with shellac.

Viola!  Custom glitter shoes!


Sunday, September 29, 2013

Easy Burlap Halloween Wreath

There are so many cute burlap wreaths floating around the internet.  I thought I would make one but of course I had to give it my own twist!  My oldest daughter actually helped me with it this time! So here is my Halloween Burlap wreath!  It was so easy and cheap!!!

 
Supplies-
 
Straw wreath  (JoAnn's-$3.00) You can use a foam wreath form as well but they are about twice the price.
Natural Burlap (1 yard- $3.99)
Glue Gun
Dollar Tree Skeleton garland ($1.00)
Wood plaque
Halloween Vinyl...(I can get this for you!)
 
So here is what I did~
Cut 3" strips of burlap. Glue one end to the wreath and wrap.  (LEAVE the plastic on the wreath.  This will prevent any moisture from getting into the straw.)
*Tip for cutting burlap-  pull out a string along the edge that you are cutting. This will create a natural line for you to follow when cutting... (see picture below).


Once you have covered your wreath, glue the end down with hot glue. If you want to add a loop to hang, now would be the time.  I would recommend a ribbon so that you don't have to deal with fraying.
 
 
Next cut a 6" strip of burlap and gently tug the string in the center.  DO NOT PULL IT ALL THE WAY THROUGH.  Hold one end and with the other end pull the string to create a gather. I cut along the short end of the piece of fabric so I used 2 separate pieces to get the right length.

 
Once you get the desired gathering, hot glue the burlap to the wreath.  You will then make a second layer by cutting a 4" strip of burlap and gather it as well.  You will glue the 4" strip on top of the 6" strip to create a darling multi-layered effect.

 
This shows the first layer. Glue the 4" strip on top of this.


You are almost done!  Lastly you will add the skeletons and your decorative plaque.  I wired my skeletons on so that I can remove them in case I choose to use the base wreath other times of the year. :) I put a string on the back of the board and hung it on my door hook (behind the wreath) and then pulled it through to the front of the wreath so that it wasn't permanent as well.  That's just how I do things!  MULTI-PURPOSE!
 
EASY PEASY!!!!!  and CHEAP!


Saturday, September 28, 2013

Vinyl subway art boards and Thankgiving lantern!

We had a great time yesterday at the annual Halloween Décor class!  Everyone's projects look great.
Next up are the items for the Thanksgiving Class.  :)  I am offering a Thanksgiving subway art design that will fit on the back of the Halloween boards that we did.  (Of course you can order one if you didn't do the Halloween board.)  Here are the projects! 


 Sign ups are open until Oct. 15th.  The class will be help on Friday November 8th at 11am.  Now get your decorating on!  Halloween is just around the corner!

PRICES
#1- Just the lantern- NO CANDLE...........  $28.00
#2- Lantern AND candle............................$34.50
#3- Subway art board VINYL ONLY............$18.00
#4- Subway art WITH board AND vinyl........$25.00

Friday, April 5, 2013

DIY Farmhouse bed!

I thought I would share with you one of the projects that I built recently!  This wonderful king size farmhouse bed!  What do you think?  It really wasn't too bad.  I got my plans from Ana White.  She has made it REALLY easy to build her DIY furniture!  She supplies the shopping list, cut list and instructions. I modified the plan when I found another version on her site from someone else who built the same bed.  Here is her link-

I wanted cubbies for storage and also wanted to access the space under the bed between the cubbies. So here is what I did~

I first build 2 sets of cubbies.  Each one is 16" deep x 15" Tall x 80" Long.
I added 1" trim to the front of the cubby to finish the edges which made the depth 17". I attached the bottom trim flush with the inside of the cubby so it raised the height to about 15 1/2".  (Visit the site and this will all make sense!)

Next I built the headboard and the foot board.  I attached the center board of the foot board to the posts with top hinges and a latch at the bottom so that I could open it to access the middle of the bed. 

Finally (After painting everything!) I screwed the headboard and foot board to the cubbies.  I used L brackets in some place to make it even more secure.  I didn't want the bed to move or squeak AT ALL!  :)

Be aware that when you follow Ana's plans she turned her king size bed on its side and so the dimensions are not exactly accurate for a typical king size bed.  READ all of the directions before you begin your project.

The overall cost was about $400 or so.  About 1/4 of what it would have cost me to buy one!  And...I know it is done right and with solid wood. 


Here are the cubbies!  I bought regular old Steralite storage bins from Target and slip covered them with canvas. I wanted BIG bins so this was my best option. 


I simply laid the tote on top of the fabric (one side at a time) and cut each piece about 2 inches bigger than that actual size to allow for the seam.  The exception was at the top.  I wanted the fabric to fold over the top so I added about 5" to the height and used the finished edge of the fabric.


As you can see there is a lip around the top of the bin. Once I sewed the four sides together I pulled the slipcover over the bin (Inside out) and I folded the fabric at the corners and pinned it so that it would fit snug and not fall off of the bin.  I then stitched the mitered corners.  I had to be careful to not sew it too tight because I had to be able to pull it over the bin. Next, I simply adhered Velcro to the bin and the underside of the fabric to attach it. I glued the Velcro to the bin with E6000 glue and held it down with masking tape until it dried. I stitched the Velcro to the fabric.  It's not going anywhere!  I am super happy with the finished project!  I think I will be adding some sort of vintage print to the front of the slip covers at some point but that is another project for another day!


Thursday, September 20, 2012

Halloween Features!

Hi everyone!  Starting tomorrow I will be featuring Halloween Decorating ideas! If you have any pictures of Halloween decor from years past or if you have already started decorating, send in your current photos!  Let's get decorating!

Wednesday, June 6, 2012

Kitchen Re-Do! Painted cabinets and more~


And now for the kitchen!  This is the before-

                                                                            Before


AFTER!


Glaze highlights all of the detailing in the cabinets


I made burlap roman shades.  YES, made them!  This gal has an easy DIY tutorial on how to make them yourself!  (Found her on Pinterest of course!) 

I added a simple valance on top of the Roman Shades,  No sew! I used the fusing tape and an iron to make this.  Super easy!

Lastly, I added some definitions to my glass canisters.  I love the way they turned out.  I must say however, I won't be selling these as the words are so small it is a nightmare to weed the negative parts of the vinyl out of the solid sheet!  If you just want the labels, ie. SUGAR, FLOUR etc.  No problem!  I can do that.  It' the little itty bitty words that were not fun!


This is always time consuming but well worth the effort!  It is actually a simple process. 

Here are some simple step by step instructions~

Quick glance guide-
1- Remove doors and hinges
2-Label doors
3-Clean doors and bases with TSP
4-Sand
5-Prime
6-Paint
7-Glaze
8-Seal
9- Hang

Detailed Instructions-

1-  Remove Each door and hinge ONE BY ONE.
 
2-  Label each door so that you know where it goes. 
(I know you may think that this is a silly step and your thinking- "Of course I will know where they will go"-      TRUST ME....label them.  It is much easier!  I wrote inside the hole where the hinge fits because  it provided enough room to write without it being covered with paint.  Another option is to use painters tape on the back side if you are not planning on painting the inside of the cupboard doors.)  I labeled them "U" for upper and then a #.  For example U1, U2 etc.  L for lower-

3.  Use "TSP" to clean the fronts of your doors and cabinet bases. This is an important step.  It will get all of the hidden grease and grime off of your cabinets.  It's there even if you don't see it! You can get this at your local hardware store.

4. Lightly sand or use a deglosser/liquid sander solution.  This will give the primer a better surface to stick to.  DON"T SKIP THIS STEP!  This is key to a good, long lasting finish.  I would recommend sanding over the liquid because it is a fail proof method.

5. Next prime.  I prefer "Gripper" brand primer as it is amazingly durable.  You can find it at Home Depot.  I cut into the grooves with a paint brush and then immediately roll over it with a smooth sponge roller.  This will prevent brush strokes and give a nice smooth finish.

6.  Time to paint!  Apply at least 2 coats of your paint in the same way you applied your primer.  Use a brush and then roll over it with a sponge roller.  BTW-  The paint people (at Home Depot) tried to tell me years ago when I started doing this not to use the sponge roller because it soaks up to much paint.  Don't listen to them.  :)  This is the only way to get the pro finish you want.  It doesn't soak up that much paint. 

7.  Lastly, if you want to glaze your cabinet doors, mix one part paint, (espresso)  to 2 parts glaze.  Brush the glaze over the doors where there are grooves.  I brushed mine over the beveled part of my doors.

Next, with a lint free cloth, rub away the glaze so that it leaves behind a rich dark color in the grooves of the door.   If you are picky like me, you can methodically pull your rag down one side of the groove and then the other to be sure the glaze leaves a nice straight (ish) line.

I ran a line of color around the edges of the doors as well even though there was no groove.  I just liked the look of it.  Again, I pulled the rag down both sides of the line to get an even line.  (If this seems confusing I basically wiped away the paint on each side of the line so that all that was left was a thin line.) You don't want it to be perfect because it is suppose to look a bit aged.  :)

8.  Last, (because I go a little over the top)  I applied a coat of glaze over the entire door to seal everything and protect the paint!  This makes it easier to clean and since your kitchen gets a lot of wear and tear, it is best to seal everything.

9. Once the cabinet bases and door are dry...(BE PATIENT,)  you get to hang them and admire all of your hard work!

Tuesday, June 5, 2012

Hand painted furniture tutorial!

I have been having way to much fun re-doing my kitchen and some furniture the last couple weeks!  I thought I would show the results!  First the cabinet-

I found the cabinet at an estate sale a couple weeks ago hiding in that back of someone's garage.  Of course it caught my eye and I convinced my hubby that I HAD to have it!  :) 

I brought it home and got to work!  After sanding, priming with "GRIPPER" primer and painting it, I distressed it with paint using an antiquing technique with paint!  I then rubbed it down with some burn sienna paint tint to give it an aged look.  I love how it turned out!  I will post the pics of the kitchen tomorrow! :)


Wednesday, May 23, 2012

Dorm Room Decor~

In honor of the many graduating seniors, I thought I would post some fun, inexpensive dorm decorating ideas.  I was able to share some of these ideas with some of my Young Women at our youth activity last night and it was a lot of fun!

Image small dorm room decorating

Image small dorm room decorating

Image small dorm room decorating

Image small dorm room decorating

Image small dorm room decorating

Image small dorm room decorating


Image small dorm room decorating

Image small dorm room decorating

Image small dorm room decorating

Image small dorm room decorating

Image small dorm room decorating

Image small dorm room decorating

Image small dorm room decorating

Image small dorm room decorating

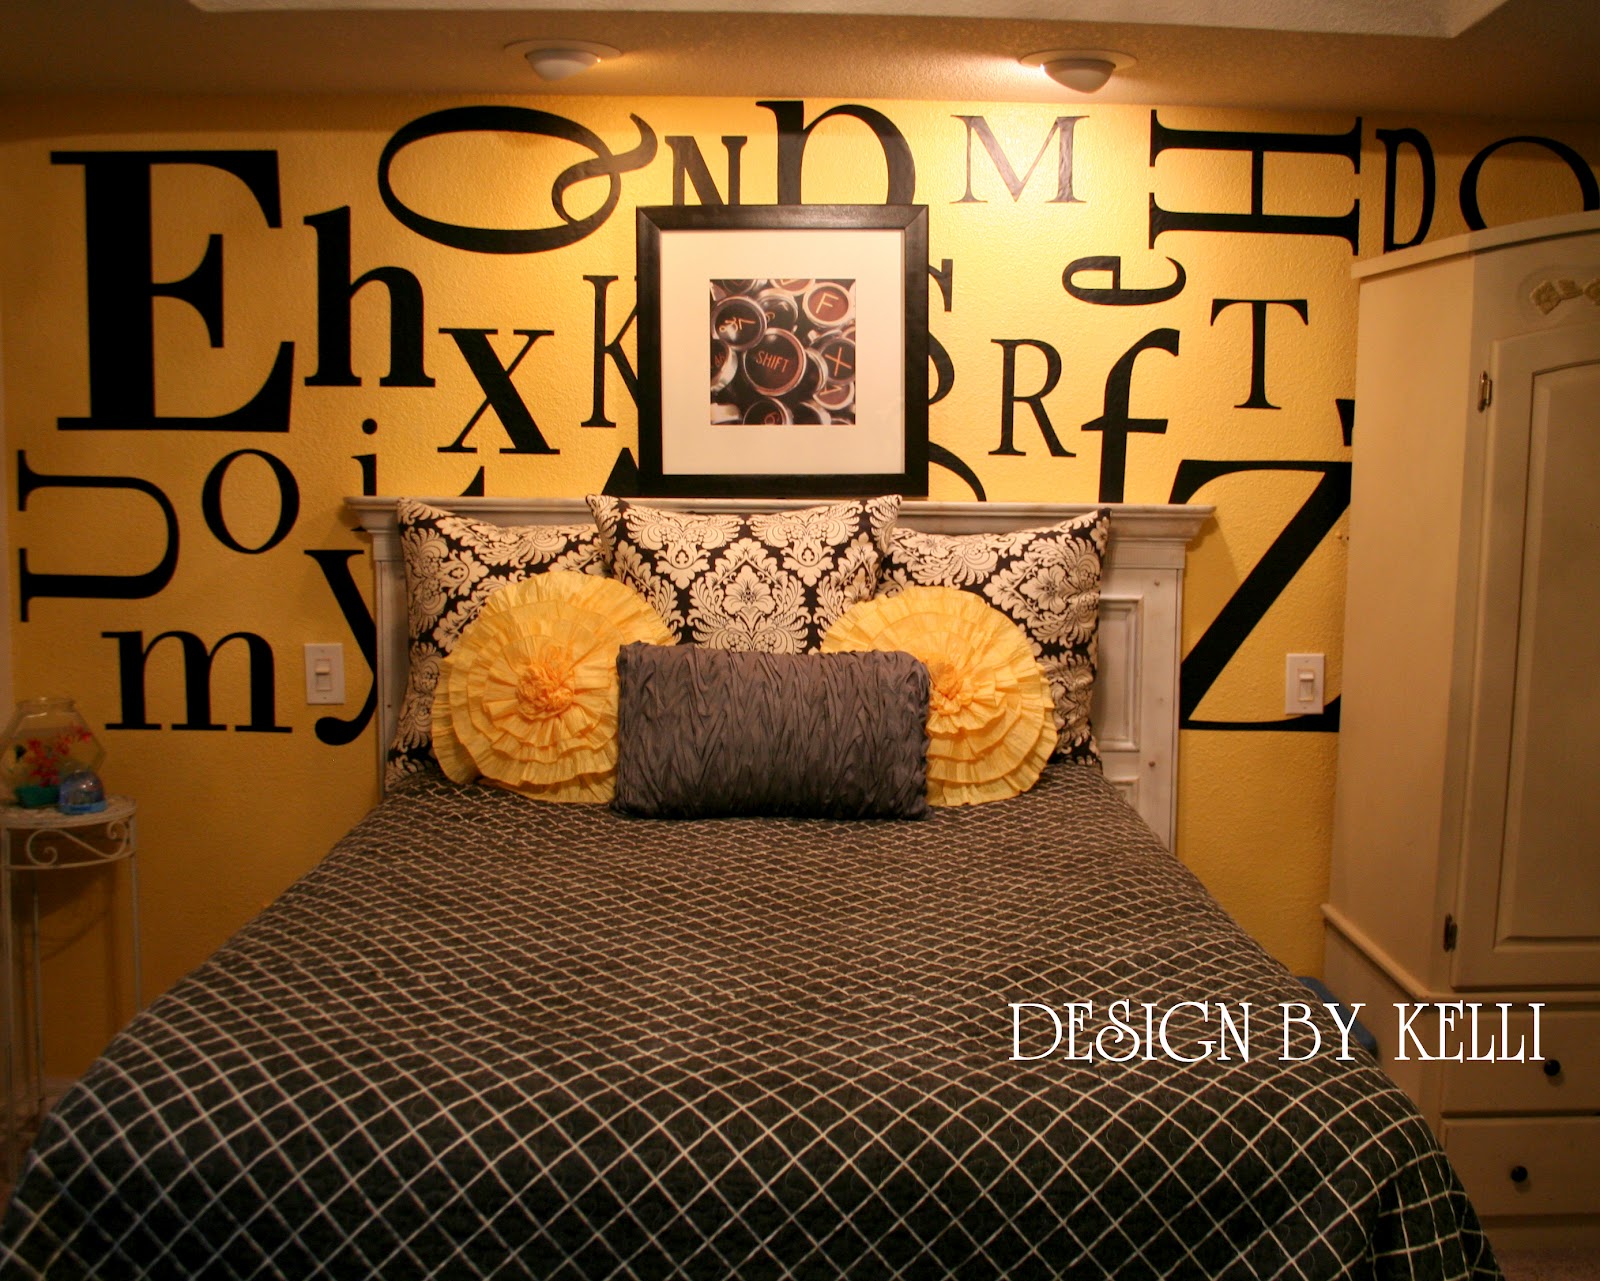
Vinyl decal typography on wall!

I thought I would share one of my designs that I created in my daughters bedroom!  I cut out different sized letters and adhered them on her wall.  Isn't this fun!?  I am pretty happy with the finished product! Yippee!
Image Typography vinyl decal

#vinyldecals, #yellowbedroom, #decorating, #typography