
Showing posts with label Craft Projects. Show all posts
Showing posts with label Craft Projects. Show all posts
Wednesday, March 25, 2015
Home decor classes~
If you are not on the email list and are interested in my home decor craft classes sign up now! I am just finishing my remodel so I will be back into the swing of things asap! :)

Wednesday, January 22, 2014
Seahawk fever!
Love my Seahawks!!! We are Super Bowl bound!


Seattle is the best place to be this time of year! There is blue and green EVERYWHERE! Seattle love's their Hawks! I may or may not have the FEVER!
Just a little somethin' I made for myself. Yes, I made some vinyl decals to dress up these puppies! A little glue, glitter and Shelac and BAM! (Tutorial Below)
So you want to make your own glitter shoes? Here's how. (Smooth material works best.)
-If you are going to apply a decal to your shoe, make sure it is exterior grade vinyl. (AND I can help you that! :)
-Clean the surface of the shoe with rubbing alcohol to remove any residue or dirt. (Just the area where you will be applying the vinyl.) Next, apply your decal.
Time to add the bling!
-Grab some EXTERIOR Modge Podge and apply it with a small paint brush. Work with ONE area at a time. If you are doing multiple colors it is best to work with one color at a time so that your colors don't get mixed. I used 2 different sized brushes. A really fine one to go around the decals and a larger one for the open areas. Take care not to get glue on the decal. If you do just wipe it of with a Q-tip. Don't fret if you find glitter stuck to the decal, you can carefully scrape it off with your nail. DO NOT apply your decal on top of the glitter. IT WON'T STICK!
-Once you apply your glue, sprinkle your glitter over the area. BE SURE YOU HAVE A PAPER TO CATCH THE EXTRA GLITTER. (This way you can pour the excess glitter back in the jar to use again.)
-Move to the next area that will be the same color and repeat. Do this until you have completed all of the areas that you want to cover with your first color.
-Repeat with each color.
-Let the Modge Podge dry overnight and seal it the next day with shellac.
Viola! Custom glitter shoes!
Friday, October 26, 2012
Thanksgiving vinyl decals~ Friday feature!
On sale today is 2 beautiful Thanksgiving designs! We have less than a week before we get to start decorating for Thanksgiving~ YAY!
If you order by Sunday 10/28/12, you can have either one of these designs for only $5.00 plus shipping! Yep, only $5!
If you order by Sunday 10/28/12, you can have either one of these designs for only $5.00 plus shipping! Yep, only $5!
 |
| Approx. 12x 6.5". Chocolate Brown and gold vinyl! |
 |
| Comes with center design and leaves! |
 |
| If you prefer a more simple design, just add the center design and put the leaves on one of your other projects! |
Wednesday, May 23, 2012
Dorm Room Decor~
In honor of the many graduating seniors, I thought I would post some fun, inexpensive dorm decorating ideas. I was able to share some of these ideas with some of my Young Women at our youth activity last night and it was a lot of fun!


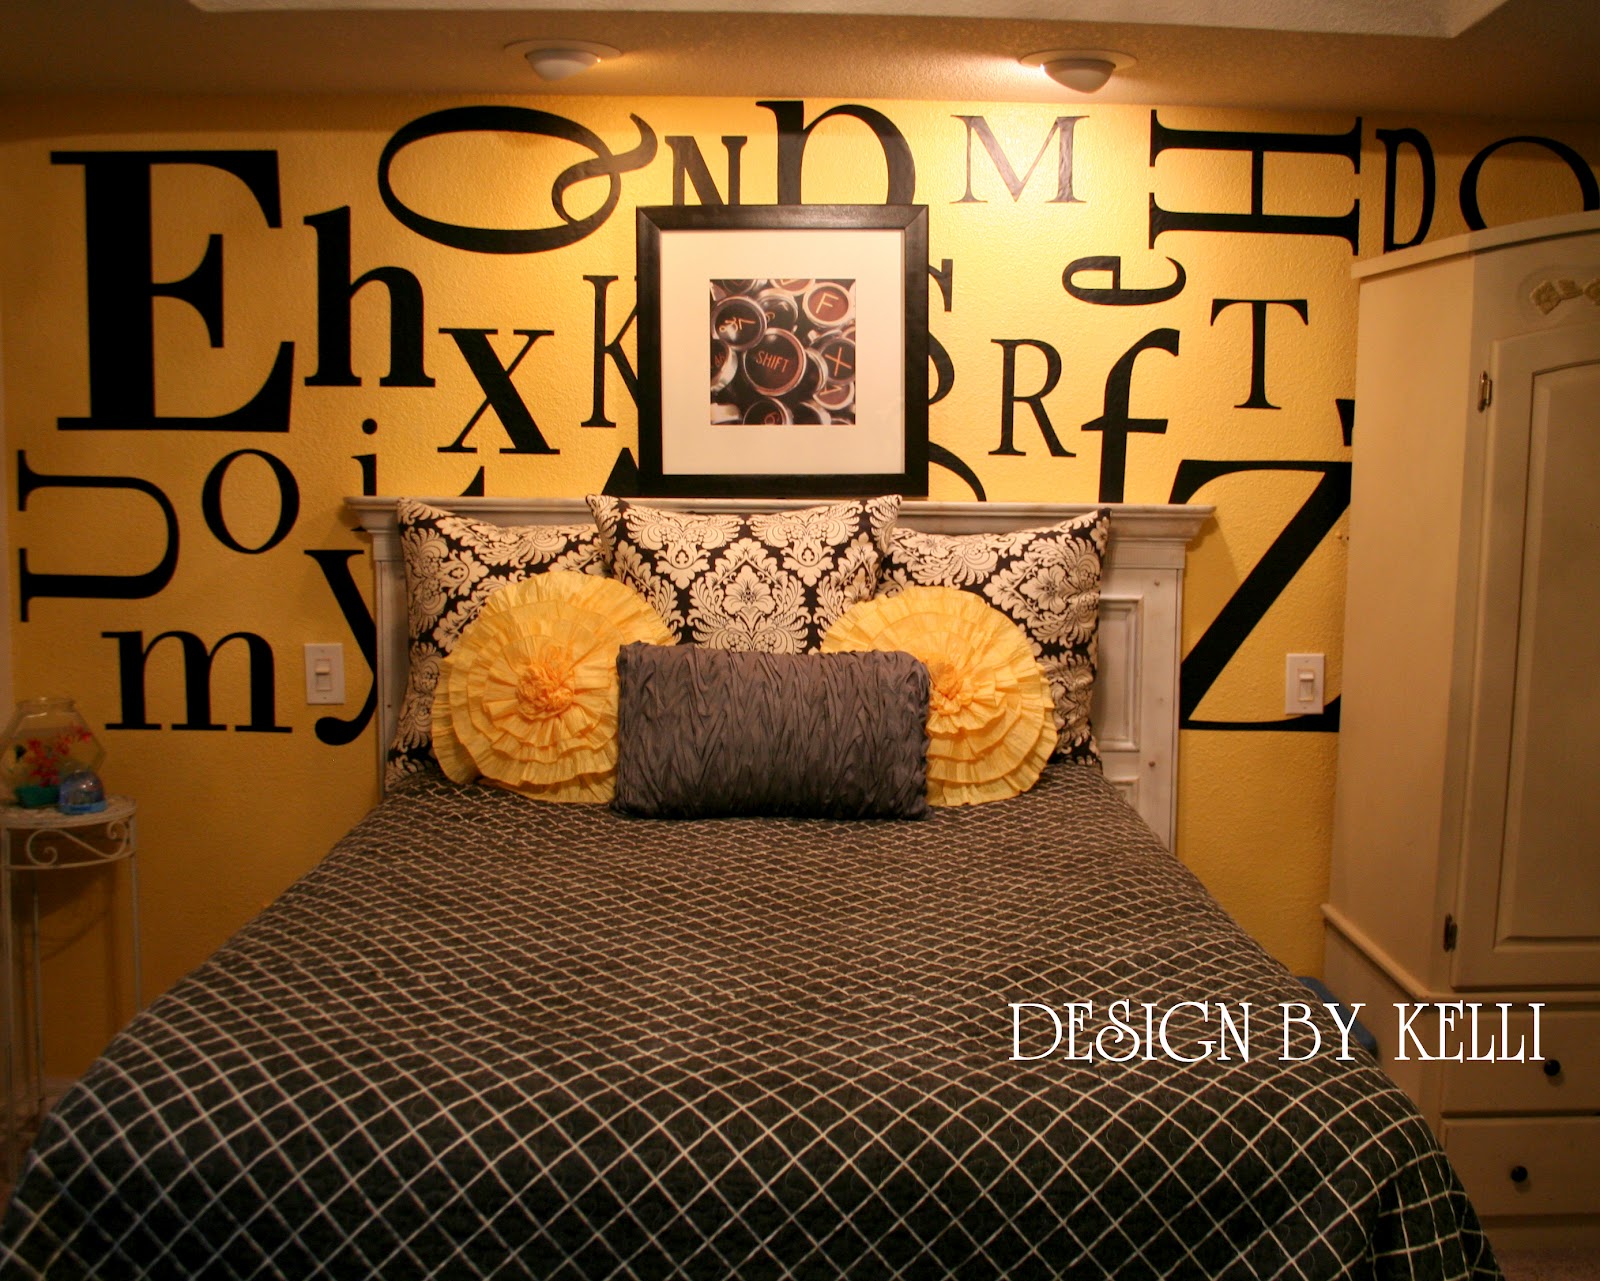
Vinyl decal typography on wall!
I thought I would share one of my designs that I created in my daughters bedroom! I cut out different sized letters and adhered them on her wall. Isn't this fun!? I am pretty happy with the finished product! Yippee!

#vinyldecals, #yellowbedroom, #decorating, #typography
Thursday, April 26, 2012
Dorm Room Decorating!
In honor of all of the upcoming graduating seniors I thought it would be fun to post some easy, inexpensive dorm decorating ideas! I had the opportunity to share some of these ideas with my Young Women at our youth activity last night and I thought it would fun to share them with you today~
Whether you are moving into an apartment, dorm or studio, the hard truth is that most students have a shoe string budget and decorating is at the bottom of the budget. Think outside of the box. Use what you have and save of storage- Yard sales and thrift stores can be a great resource for fun purchases. 3M removable hooks will be a must have as most student housing does not allow holes to be put in the walls.
Use your a cute pair of heels for bookends! How about creating an artwork wall with your hats, purses or scarves! Take a peek at some of these photos. They are all inexpensive and very easy~
Whether you are moving into an apartment, dorm or studio, the hard truth is that most students have a shoe string budget and decorating is at the bottom of the budget. Think outside of the box. Use what you have and save of storage- Yard sales and thrift stores can be a great resource for fun purchases. 3M removable hooks will be a must have as most student housing does not allow holes to be put in the walls.
Use your a cute pair of heels for bookends! How about creating an artwork wall with your hats, purses or scarves! Take a peek at some of these photos. They are all inexpensive and very easy~
 |
| Use different sized embroidery loops and mix and match fabric to add color to your room! Hang it with twine or 3M removable hooks! Choctawk |
|
| An easy way to add color to your walls is to hang fabric. No need to invest in expensive fabrics, simply find a sheet, inexpensive drapery panel and hang it with twine or a rod using 3M removable hooks! This works great for a headboard as well! Define the head or your bed with a section of fabric~ |
 |
| Of course vinyl decals are an inexpensive way to add personality to your boring walls! Use quotes, monograms or decorative designs to add your own flare! They are easy to install and easily removed~ |
|
| I LOVE this idea! So easy to do! Use paper doilies, (You can find these at your local dollar store!) and hand them with tape, ticky tack or twine. SOOOOO cute! |
|
| This is a really easy way to add color to your walls. I believe these are paint sample sheets that you can get at Benjamin Moore. This is an easy way to create a color blocking design without painting. I would recommend decoupaging the paper to protect it. |
|
| Another variation of color blocking with scrapbook paper! You can purchase an entire coordinationg stack pack of scrapbook paper at Joannes for only $10 when you use one of their coupons or wait for them to go on sale..(which is frequent) Lovely Undergrad |
|
| This is a crazy but super fun idea! I just had to post it. :) The uncommon perspective |
|
| I loved this room. It is a bit more over the top but I wanted to share it because it is a great example of what is possible in such a small space. Frequent yard sales, thrift stores and fleas markets and you are bound to fin treasures for next to nothing! |
|
| This is too cute! What and easy way to create dramatic art and useful storage all at the same time! pbteen |
|
| Large posters, cork boards and frames are a great way to dress any drab space and add some of your personality! cool-kids-rooms |
Friday, March 9, 2012
Spring Decorating ideas.
Are you itching for spring to come? I know I am! Take a look at these wonderful ways to freshen up your place with these easy decorating ideas!
The more rustic the better! Grab an old watering can and add some soil and plant your favorite spring flowers!
 |
| www.midwestliving.com |
I love these shabby design touches!
 |
| frenchlarkspur.blogspot |
 |
| frenchlarkspur.blogspot |
I have a design similar to this in my own home every spring! TJ Maxx is a great place to find these rustic baskets. They have several to choose from. Of course the antique blue canning jars are a perfect addition! If you don't have any, simply make your own!
 |
| frenchlarkspur.blogspot |
I love the pink against the black door!
 |
| Etsy |
LOVE THIS! This is the same idea as the watering can. Line the umbrella with plastic....(A heavy duty grocery bag will do.) Fill it with soil and add your favorite spring flowers!
 |
| tinywhitedaisies.tumblr |
Wednesday, January 11, 2012
Heart Shaped Crayon Valentines!
Time for some fun Valentine projects! Let's take a look at some cute valentine card ideas. Of course, you can do as simple or as complex as you would like but as we all know kids love to get some sort of treat with their Valentine card. Today I will show you how to make crayon hearts!
These are so fun and really easy to make. Gather your misc. crayons and strip all of the paper off of them. If you need to purchase crayons, your local Dollar Store is your best option. Many tutorials will tell you to cut them into small pieces but this is very time consuming! Instead, put them in a plastic baggie and break them up with a meat tenderizer. Be careful not to totally crush them. You will get more color variation if the crayons are chunky. After they are broken into small pieces, place the crayons into a heart shapes pan or silicone mold. After you have filled your molds, place them into the oven on low heat. Bake at 250 for 15 minutes or just long enough to melt the crayons.

Adhere the heart shaped crayons onto a paper Valentine! It is best to use card stock for your card to hold the weight of the crayon. Take a look at these finished products!
These are so fun and really easy to make. Gather your misc. crayons and strip all of the paper off of them. If you need to purchase crayons, your local Dollar Store is your best option. Many tutorials will tell you to cut them into small pieces but this is very time consuming! Instead, put them in a plastic baggie and break them up with a meat tenderizer. Be careful not to totally crush them. You will get more color variation if the crayons are chunky. After they are broken into small pieces, place the crayons into a heart shapes pan or silicone mold. After you have filled your molds, place them into the oven on low heat. Bake at 250 for 15 minutes or just long enough to melt the crayons.
 |
| armcandyconfessions.com |
(Individual silicone molds)
 |
| Megasimple.blogspot.com |
Once the crayons have turned into a "liquid rainbow" remove them and let the wax cool until hardened. If your wax looks cloudy, no worries, in a couple hours it will be clear and pretty!

Adhere the heart shaped crayons onto a paper Valentine! It is best to use card stock for your card to hold the weight of the crayon. Take a look at these finished products!
This one is from arm candy confessions
From small little pieces of crayon to a super cute homemade valentine!
  |
| thelongthread.com |
Sunday, January 8, 2012
Valentine's Day Decor!

Here is the tutorial~
Materials-
Wood plaque or board
Off white acrylic paint
Sand Paper
4 small decorative mirrors- ($1.50 @ Michael's)
Scrapbook paper- 3 different designs
Decorative scissors
Hot glue
Medium tack spray adhesive
"LOVE" Vinyl lettering. Only $3.75!
First you need to get yourself a wood plaque. I cut and prep these myself. It is not as hard as you think. Go down to your local hardware store and purchase a pine board that is about 8" wide. They usually come in lengths of 6', 8', 10', and such. If you go to Home Depot they will cut it for you! Just tell them the length you want and they will cut the board down to create several boards for all of your craft projects! For this project I used a board that was cut down to 24" long by about 8" Wide.
Be sure to sand the edges and surface of your wood to ensure a smooth finish. If you have the skills and the tools you can even use a router to give your plaque and decorative edge.
Next, paint the outer edges and a border around the surface of your board. No need to paint the entire surface because your paper will cover most of it. As you see below, only about 1/4" of the wood is exposed after the scrapbook paper is applied.

Next, cut your paper to fit your board. Keep in mind that if you use a board that is longer than 12" you will need to use 2 pieces of paper to cover the length of your board. My paper measures 6"x 10" each. This leaves a 1" border around the surface paper. If you choose a paper with a print, be sure to match up the design at the seam so that the seam is somewhat disguised. When you apply the frames they will cover a lot of the board so no need to worry about the seems being very noticeable.
Continue to cut a 1" border for the outer edge of your board using scalloped craft scissors to create a cute scalloped border. Leave one edge straight. It can be tricky to keep your cuts level when using scrapbook scissors. It makes it much easier to match up your borders if you use your original cut as a template by lightly tracing your original strip onto your paper. Your will end up with 6 strips- 2 for the side and 4 for the top and bottom. (See photo below).

Once you have cut all of your paper, do a test run to make sure all of your paper fits the surface the way you want it to. You will overlap your trim pieces (red) onto your surface paper (pink) so that you cannot see the edge of the pink paper. Once you are satisfied with the look, use your spray adhesive to adhere your paper to the board. The adhesive is a great alternative to using Modge Podge and is MUCH less messy! Just be sure to spray it outside or in a protected area because the over spray of the adhesive will stick to your surfaces and is VERY difficult to clean up.
This is what is should look like-

Now it is time to prepare the frames. I chose 3 rectangle and one round frame. Michael's has red, black, blue and cream frames. I chose red and blue but lightened the blue by painting it.
Turn the frames over and remove the stand and backing clips. You do not want these on the frames because they are bulky and prevent the frames from lying flat on the board. No worries about them staying closed because it will be glued shut when you glue it to the board.
Remove the paper inside the frame and replace it with coordinating scrapbook paper. It makes it easier if you use the original template from the frame to trace your new paper.

Next glue your frames on your board spacing them evenly. I find it easier to place the first frame and then the last before placing the 2 in the center. This will ensure better spacing.
Last, place your vinyl letters on the front of the frames and you are done! (You can order the lettering from me for only $3.75. Just shoot me an email! designbykelli@gmail.com)
HOW CUTE IS THIS?!

Thursday, December 1, 2011
Beautiful vinyl snowflake decals!
I just have to share these GORGEOUS vinyl snowflakes with you! They look great on windows, mirrors and doors as well as all of your crafting projects. I am going to place them in my windows in a random pattern to make it feel like snow is falling. :)
Choose up to 6 snowflakes that fit in a 15" sq area for only $10.00!!! Just shoot me an email and let me know which ones you would like.
HAPPY HOLIDAYS!

Choose up to 6 snowflakes that fit in a 15" sq area for only $10.00!!! Just shoot me an email and let me know which ones you would like.
HAPPY HOLIDAYS!

Subscribe to:
Posts (Atom)